In this tutorial, we will show you how to install a custom ROM on Android devices. One reason why the Google-owned OS is loved by one and all is its open-source ecosystem. This straight away gives the users the ability to customize their device as per their requirements. From applying tons of themes, icon packs to trying out different device wallpapers and font styles, there is no limitation as to what all could be achieved. However, this is just the tip of the iceberg. If you are ready to set your feet into the custom development scene, then there is an ocean of modifications waiting out there for you.
Right from unlocking the device bootloader to installing a custom recovery like TWRP, you could try it all. Then there is also an option to attain administrative privileges by rooting their device via Magisk. But what most of the users are really interested in is flashing a custom ROM on their Android device. And in this guide, we are here to help you with just that. We will list out all the necessary steps to flash any type of custom ROM across any Android device. But first, let’s check out more about these Custom ROMs and advantages do they bring in the first place. Follow along.
What is a Custom ROM:
Every OEM ships their device with a stock ROM or stock firmware. They provide all the necessary features that they deem it for the userbase. But here is the thing. Neither could they satisfy the need of each device owners nor the userbase could be forced to use just what the OEM has to offer. Enter Custom ROM into the scene.
These are the modified version of the stock firmware with additional features and customizations. Since Android is an open-source platform, its source code is available for everyone to use. The developers make full use of these codes, edit them as per the need, recompile it, and re-release for a specific set of devices.
Advantages of Custom ROM:
So the next question that might come to your mind is why does one need to replace the stock ROM with a custom one. Well, there are a plethora of reasons to do. To begin with, you get a plentitude of new features and customization options. Furthermore, every OEM releases Android upgrades for 2-3 years at max. However, in terms of custom ROMs, these updates go for a considerably longer period of time.
So even if your OEM stops releasing newer Android upgrades, you could get a taste of the same via these Custom ROMs. Apart from that, these modified firmware are also able to improve device performance and optimize battery usage in some cases. So with so many goodies to offer, it is no wonder why the tech enthusiasts are always looking to flash a custom ROM on to their device.
Risks With These Custom ROMs:
First and foremost, flashing a custom ROM requires you to have an unlocked bootloader. This, in turn, might make your device’s warranty null and void. Likewise, if you install a custom ROM, you need to wipe off all the data on your device. You will also need to have a custom recovery like TWRP installed, which will replace your device’s stock recovery. Furthermore, you would no longer receive regular official updates from your device manufacturers.
Likewise, some of these ROMs might be buggy and unstable as well. The entire process is itself quite risky and might lead to a bootloop or even a bricked device, if not done correctly. So with that said, you are now aware of the perks and risks associated with flashing a custom ROM. If you wish to proceed with the steps to install the custom ROM onto your Android device, then here are the required instructions.
How to Flash Custom ROM on Android:
While there exist a plethora of custom ROMs, fortunately, the steps to flash them onto your device follow a near about identical path. With that said, here are all the requirements that you would be needed before beginning with the flashing part.
Prerequisites:
- To begin with, we would request you to take a complete device backup. This is because every time you flash a custom ROM, you will be wiping the data partition. This will erase all the data from your device.
- Next up, download and install the Android SDK Platform Tools on your PC. This will provide the necessary ADB and Fastboot binaries, and will also help the PC in recognizing in the ADB and Fastboot Modes.
- You will also have to enable USB Debugging. The former will be needed to execute a bunch of ADB commands. The latter will help us in the unlocking process. So head over to the device’s Settings page > About Phone > Tap on Build Number 7 times (MIUI version 7 times if it is a Xiaomi device) > Go back to Settings > System > Advanced > Developer Options > Enable USB Debugging and OEM Unlocking.
Now head over to the below section and grab hold of the necessary files that will be needed to install a custom ROM on your Android device.
Downloads:
- Download the desired custom ROM for your device. Some of the most famous ones include LineageOS, Pixel Experience, HavocOS, Paranoid Android, Derpfest, among others. You could download them all from our site or refer to the XDA developers website as well. Just make sure that the ROM corresponds to your device’s model number and not its Lite or Pro version.
- Next up, you may also need the Google Apps and Services package, known as GApps. Do keep in mind that some ROMs like Pixel Experience already have in-built GApps, so you might not need it. So before going for the download, please go through that ROM’s forum and check whether the GApps come packed with it or not.
- Finally, download the TWRP Recovery corresponding to your device. Head over to the TWRP official site and download the TWRP build for your device. If the official version isn’t available, you might download the unofficial builds from XDA as well. However, the mileage in terms of stability might vary, but you will still be able to flash files nevertheless.
That is all the required files and prerequisites. You may now proceed with the steps to install Custom ROM on your Android device.
STEP 1: Unlock Bootloader on your Device:
First and foremost, you need to unlock the device’s bootloader. Here are the required instructions for that. For a much-detailed instruction set, refer to our guide on How to Unlock Bootloader and Fastboot Method on Android and Unlock Bootloader on Xiaomi Devices using Mi Unlock Tool
- Connect your device to PC via USB Cable.
- Head over to the platform-tools folder, type in CMD in the address bar, and hit Enter. This will launch the Command Prompt.
- Type in the below command to boot your device to fastboot/bootloader mode:
adb reboot bootloader- Now execute the below command to unlock the device’s bootloader:
fastboot oem unlock- On the other hand, if you are having a Pixel or Nexus device, you will have to enter the following command:
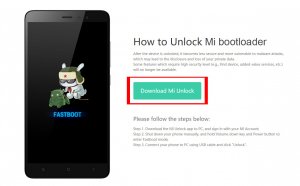
fastboot flashing unlock- Xiaomi device owners will now need the Mi Flash Tool to unlock the bootloader. They should refer to our guide on How to Unlock Bootloader on Any Xiaomi Devices Using Mi UnlockTool.
- Finally, execute the below command to boot your device to the Android OS:
fastboot reboot
- Once the device boots, sign in with your Google ID and set it up. Then proceed with the next set of instructions to install Custom ROM on your Android device.
Unlock Bootloader In Mi
First of all you need to unlock bootloader to install TWRP recovery in your Mi device. You can visit our How to unlock bootloader in Mi device article to know more about it.
- CLICK HERE to Download the Mi Unlock app for PC.
- Extract the zip file in your PC and open the application named “miflash_unlock.exe”
- Now sign in with your Mi Account;
- Switch off your Mi mobile and enter in Fastboot mode by holding Volume down key and Power button together.
- Connect your phone to PC using USB cable and click Unlock.
- Now click on Unlock anyway two times.
STEP 2: Install TWRP Recovery:
You will now have to install the TWRP Recovery on your device. While some devices have just the image file, others have both the image and ZIP installer.
- Rename the downloaded recovery image file to just twrp. The complete name will then be twrp.img.
- Place this twrp.img file inside the platform-tools folder. If your device’s TWRP also has a ZIP file, then transfer it to the device’s internal storage.
- Now launch the Command Prompt window inside the platform-tools folder.
- If your device only has the image file then execute the below command in the CMD window to flash the recovery
fastboot flash recovery twrp.img
- Then use the following command to boot your device to TWRP
fastboot boot twrp.img
- On the other hand, devices with both the ZIP and Image files should first boot their device to TWRP using:
fastboot boot twrp.img - Then head over to the Install section of TWRP, navigate to the TWRP ZIP file, and perform a right swipe to flash it.
- Then head over to reboot and select System. This will boot the device to Android OS.
That is it. You have now successfully installed the TWRP Recovery on your device. Now you could easily install the custom ROM on your Android device as follows.
STEP 3: Install Custom ROM on Android:
- Transfer the downloaded custom ROM to your device’s storage. If the GApps package is also needed, transfer it to your device as well.
- Then reboot your device to TWRP using the below command. Make sure USB Debugging is enabled
adb reboot recovery
- Within the TWRP, head over to the Wipe section. Then tap on Advanced Wipe and select Dalvik/ART Cache, System, and Data from the menu. Do not select Internal Storage.

TWRP 
Orange Fox Recovery


- Perform a right swipe on the Swipe to Wipe button to erase the selected partitions.
- Then go back to the TWRP home screen, navigate to the downloaded custom ROM and perform a right swipe to flash it.
- The process might take a minute or two. Once that is done, if you need to flash GApps as well, then head over to Install, select that GApps ZIP file and again perform a right swipe to flash it.
- You may now finally reboot your device to the newly installed ROM. For that, head over to Reboot from TWRP and select System.
So that is all from this guide on how to install Custom ROM on any Android device. If you have any queries with respect to any of the aforementioned steps, do let us know in the comments section below.